Harriet Bucher, Physiotherapist, B. Sc.
Vienna/Austria
(certified YIDL teacher)
2003/October/16
Introduction
These exercise programmes against back pain are the result of the cooperation between a yogi, Paramhans Swami Maheshwarananda, and allopathic doctors and physiotherapists, sharing experiences from their many years of work in this field. Out of this exchange, a valuable synthesis of eastern and western science has emerged.
In each Level of the programme, the whole body is treated using relaxation, stretching and strengthening techniques. This means that each Level is self-contained with regards to the way it works as an integrated, holistic unit of exercise through which the combined effects of the Yoga techniques can come to full expression.
It is advisable to practise the complete programme of Yoga Against Back Pain to gain the full holistic benefits of yoga. But if you feel pain or stiffness in a specific part of the spinal column, you can add the appropriate exercises to your daily practice and this will certainly have a beneficial effect on the problem area of your spine.
This article will cover the Cervical part of the spine (the neck). It will give you some information about anatomy and correct posture of the Cervical Spine, as well as special exercises that have a positive influence on this area. In the next two follow-ups we will address the Thoracic (upper back) and Lumbar (lower back) regions in a similar manner.
The Cervical Spine
Nearly all the sensory organs are located in the head. The great mobility of the Cervical Spine enables a wide field of vision and assists the orientation and balancing functions within the head. However, the Cervical Spine must also have adequate strength and stability, in order to support the head in an economical position. Free joint movements and well-stabilised neck and throat musculature are responsible for this. Flexion, extension, lateral movement and rotation are possible in the Cervical Spine.
The first two Cervical Vertebrae differ in their anatomical structure to other vertebrae.
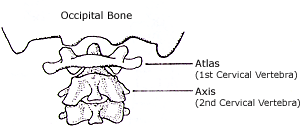
Picture 1 - The first two Cervical Vertebrae
Between the back of the skull and the 1st Cervical Vertebra (Atlas) forward and backward movement, as well as lateral (sideways) movement of the head, are possible.
Between the 1st (Atlas) and the 2nd Cervical Vertebra (Axis) most of the rotation movement of the head takes place. The Atlas has no body, but consists of two arches connected to one another. The Axis has a process (Dens) that projects into the arch of the Atlas.
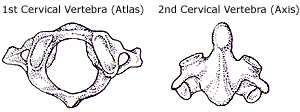
Picture 2 - The first two Cervical Vertebrae
Postural Problems in the Region of the Cervical Spine
The Cervical Spine carries the entire weight of the head and compared with other sections of the spinal column it is very delicate. It is the most mobile section and due to this, the danger of wear and tear through incorrect postural and movement habits is relatively greater.
The most sensitive parts are the points of transition from the base of the skull to the 1st Cervical Vertebra and from the last of the Cervical Vertebrae to the Thoracic Vertebrae. Both these regions are the most overtaxed by postural errors. They also react to mental strain by creating muscular tension.
The most common postural error is when the head is pushed forward. This leads to a tensing and shortening of the neck musculature, circulatory problems in the head, neck, shoulder and arms, and an overtaxing of the ligaments and discs.
Symptoms of this postural error can include dizziness and head, neck and shoulder pain. Migraines can also by triggered by energy blockages (nerves, blood flow) in the cervical spine.
In addition to the Yoga exercises, which help to stretch, relax and strengthen the throat and neck musculature, the position of the head must also be corrected in order to eliminate the problem.
To find the correct posture, one can imagine that a marionette string pulls the back of the head upwards and moves the chin in slightly towards the throat. With this, the neck is stretched and the Cervical Spine is relieved of strain.
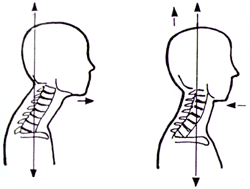
Picture 3 - Incorrect Head Position (chin pushed forward) and Correct Head Position
Problems in the region of the neck and shoulder girdle are also commonly caused by stooped or “hunched-up” shoulders. Once one becomes conscious of this habit, it is important to continually observe and consciously relax the shoulder girdle.
Physical Exercises (Asanas)
Neck Relaxation
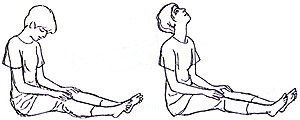
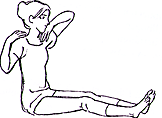
Starting Position: Sit with your legs straight. Head, neck and back are in alignment. Imagine the top of the head is pulled upwards by a thread in order to lengthen the neck as much as possible and straighten the back. The hands rest on the thighs.
Please note: For many people sitting with the legs straight is an unaccustomed and uncomfortable position. The main reason for this is limited mobility of the hip joints. This starting position and those exercises sitting with the legs straight, are to improve the mobility of the hip joints and strengthen the muscles of the back. Sitting in this way needs some practice and you will find that each time it becomes easier to maintain.
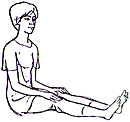
Picture 4 - Sit with your legs straight
Variation a:
- Inhale deeply into the abdomen.
- Exhaling tilt the head to the right (the right ear comes closer to the right shoulder but the right shoulder should not lift).
- Inhaling move the head to the centre.
- Exhaling tilt the head to the left.
- 5 times to each side in rhythm with the breath.
5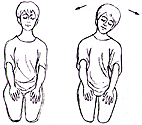
Picture 5 - Neck relaxation (Variation a)
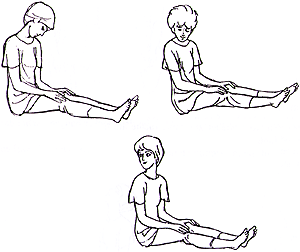
Variation b:
- Inhale deeply into the abdomen.
- Exhaling bend the head forward and then allow it to hang relaxed. Pay attention that the back stays straight.
- Inhaling lift the head back to the centre (keep the neck extended) and then tilt it backwards.
- 5 times slowly and carefully in rhythm with the breath.
Picture 6 - Neck relaxation (Variation b)
Caution: If there is any pain, instability of the Cervical Spine, or a tendency towards dizziness, then do not tilt the head backwards! In this case only move it forward and then back to the centre.
Variation c:
- Inhale deeply into the abdomen.
- Exhaling bend the head forward, chin moving towards the chest.
- Inhaling move the chin in a quarter circle to the right shoulder.
- Exhaling move the chin towards the chest.
- Inhaling move the chin in a quarter circle to the left shoulder.
- Exhaling move the chin again back towards the chest.
- 5 times to each shoulder.
Picture 7 - Neck relaxation (Variation c)
Benefits: Relaxes the neck, throat and shoulder region.
Shoulder Circling
Starting Position: Sit with legs straight. The head, neck and back are in alignment. The arms are bent and the fingers are placed on each shoulder.
Variation a:
- Inhaling move the elbows in a large half circle backwards.
- Exhaling move the elbows in a large half circle forwards so that they touch in front of the body.
- 5 large circling movements in one direction and then 5 in the opposite direction.
Pay attention that, as the elbows describe as large a circle as possible, the movement not only takes place in the shoulder joints, but also in the shoulder girdle (consisting of the shoulder blades and the collarbones).
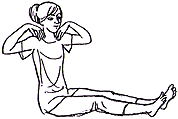
Picture 8 - Shoulder circling (Variation a)
Variation b:
- Perform the circles alternately – as you move one elbow forward, move the other one backwards.
- 5 times in one direction, then 5 times in the opposite direction.
- The breathing is relaxed, but a little deeper than normal.
Picture 9 - Shoulder circling (Variation b)
Benefits: Relaxes the muscles in the region of the shoulder joints, the shoulder girdle and the upper ribs; also deepens the breath.
Shashankasana (Hare)
Starting Position: Sit on the heels (Vajrasana). The back is straight and in line with the head and neck. The hands rest on the thighs, elbows relaxed.
- Inhaling deeply extend the arms forward and up above the head.
- Exhaling slowly bend forward from the hips keeping the back straight. The arms remain in line with the back.
- When the abdomen is lying along the thighs relax the forearms, elbows and head to the floor.
- Remain in this position for 10 breaths.
- Inhaling raise arms and head so that they are in line with the back and lifting from the hips raise the upper body again, arms above the head.
- Exhaling lower the arms to the starting position.
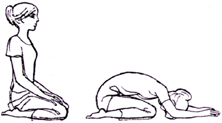
Picture 10 - Shashankasana
Points to observe: In this position you can more easily feel and improve the breathing into the back. Guide the inhalation to the whole back as far down as the sacrum and coccyx. Allow the back to broaden with the inhalation and feel the relaxation with the exhalation. Make sure that the neck and the shoulders are completely relaxed.
Benefits: Relaxes the entire back and neck. Relaxes and improves circulations into the neck, shoulders, eyes, the head and the brain. Deepens the breath – particularly into the back. Harmonises the function of the pelvic organs and stimulates digestion. Is very calming and relaxing, and at the same time improves concentration. It is helpful for depression, nervousness, over-tiredness and headache.
Caution: This position should not be practised with high blood pressure, dizziness or glaucoma.
Materials presented here are presented in more detail in the book "YOGA AGAINST BACK PAIN" (original in German: Yoga gegen Rueckenschmerzen) by Mahamandaleshwar Paramhans Swami Maheshwarananda.
Although such papers and books are a valuable help and good source of information, they cannot entirely replace direct expert guidance, not to mention the diagnosing and treatment of more serious problems. Exercises described in this series are a very good prevention, helping to correct posture and alleviate minor back problems. Still, in case of more serious problems, you should first consult your physician about starting the exercises; exercises cannot be the only therapy in such cases.